Showing posts with label Formulas. Show all posts

Monday, 15 May 2017

Monthly Report Tutorial

At a former client, I was asked to submit monthly reports that show details of work performed in 15 minute increments.

My line of thought went something like this,

"Let's see, a monthly calendar, something like the one on my fridge door comes to mind and making one in Excel should be easy..."


One problem is space. If I do several tasks in one day, do I use tiny font to make the details fit, or do I make the calendar larger to the point that I have to scroll copiously?

Also, just how practical is that style of calendar going to be when it comes to adding up total time per task? Something along the lines of a regular timesheet would be better.

I can easily fit 32 rows on my laptop screen. That's a good start. So here's how to do the same thing I did, if you are interested.

Leave the first row for your headers. In cells A1 and B1, enter "Date" and "Day", then change the orientation. Right click the cells, select Format Cells, Alignment, and change Orientation to 90 degrees.


(You might want to change the Alignment too. Choose from the options on the Alignment Group on the Home Tab)

Enter the first day of the month in cell A2. Select range A2:A32, then change the format to either "d/m" or "m/d" as you prefer. Right click the cells, select Format Cells, Number, and enter the format in the Type text box in the Custom section.


Now enter =A2+1 into Range A3:A32 and click your Ctrl and Enter keys simultaneously to enter the formula into all selected cells.

In the same way, enter =CHOOSE(WEEKDAY(A2,1),"Su","Mo","Tu","We","Th","Fr","Sa") into Range B2:B32.

Adjust the width of both of these columns and set the alignment to suit.

You should have something like this.


And now for the details. Long descriptions take up space, so let's use numbers instead. Keep in mind that longer tasks won't be completed in 15 minutes, and recurring tasks will be duplicated so that's going to cut down the number of tasks in total. With any luck, we can keep things within double digits.

Start times allotted for the 15 minute intervals go in Row 1. Adjust the Orientation to 90 degrees. "h:mm" is a suitable format.


The task descriptions that match the numbers can go on the right. But note the numbers to their left to perform a lookup.


Important: adjust the following ranges to suit your requirements. Use Named Ranges if you prefer.

Enter formulas to add up the time. Type the following formula into Cell AI2, and drag down to the end of your list.

=IF(COUNTIF($C$2:$AE$32,AG2)=0,"",COUNTIF($C$2:$AE$32,AG2)/4)
You should have something like this.


You can freeze the first row if the number of tasks exceed the number of visible rows on your screen. (View Tab, Windows Group, Freeze Panes, Freeze Top Row)

Now for some extra features to enhance visibility. Why not add some Conditional Formatting to highlight the weekends? With Range A2:AE32 selected, click the Home Tab, Styles, Conditional Formatting, New Rule, then "Use a formula to determine which cells to format" and enter this formula. (Click the Format button to choose a suitable format)


Here's the result.


An ActiveX Combo Box and a bit more Conditional Formatting makes it easy to see when the work was done. If you can't see the Developer Tab on the Ribbon, select the File Tab, Options, Customize Ribbon, then tick "Developer" on the list to the right and click the OK button.


On the Developer Tab, select Insert from the Control Group to add an Active X Combo Box. (I've already added one to Cell AH1)


Right click the Combo Box and select Properties. Set the LinkedCell and ListFillRange properties. I've hard-coded my ListFillRange range reference but you can use Named Ranges too, as in "=Tasks" without the quotation marks.


When finished, toggle off Design Mode on the Developer Tab.

Note the linked cell. That gives me the selected item of the list. Now I use another formula to get the reference number which I have put in the cell below the linked cell (In this case, Cell AJ3).

=MATCH(AJ2,AH:AH,0)-1
If I select the first item on the Combo Box, Cell AJ3 will show 1.


Here's the Conditional Formatting for the details part of the report. (Range C2:AI32)


And here's the Conditional Formatting for the list. (Range AG2:AH32)


I also added some Data Bars to the hours.


And we're done.


No VBA was used so you can send the file without explaining the need to enable macros.

Here's a download link if you want to skip making one yourself.

Saturday, 10 December 2016

Icon Set Alternative

I'll be honest. I never use icon sets. But I had a look at them the other day and thought that they didn't do what I expected.

Here's a screenshot of them in action.


For those not familiar, icon sets are used the following way. Select the range of cells you want to add them to, then on the Home tab, select Conditional Formatting, Icon Sets and choose which one is best for you.


Let's see what they are actually doing. Select Conditional Formatting from the Home tab, then Manage Rules, select the rule in use (you should be able to see Icon Set on the right), then click Edit Rule.


Okay, it appears that the icons change according to what range of values they are in. I would prefer to see when values change regardless of range, so an ↑ arrow for increases, ↓ arrow for decreases and a → arrow if values stay the same.

It's easy enough to set up an alternative. First the arrows - I could use Wingdings 3 font to get some arrows, but I've decided to go a different way for formatting preference, and because it's easier to use actual arrow characters inside formulas, rather than use "g", "h" and "i", then try to remember what they refer to later on.

So I selected Symbol on the Insert tab, then selected the Arrows subset on the Symbol dialog box and inserted them into a cell for later use.


Jumping ahead, the next screenshot shows what I'm up to. I've entered the following formula from the second cell down in an adjacent column. Left or right, it's up to you. Note that I'm not including the top cell. Formulas and formatting start in Cell B3.


And as you can also see, I've entered a conditional format. Green if Cell B3 is greater than Cell B2. Note that for Conditional Formatting, you only need to use a TRUE condition. And as the whole range is selected, Conditional Formatting will adjust the condition's cell references to work with each cell accordingly.

By the way, I formatted the font by clicking the Format button, then Color (Americans don't know how to spell. They did invent Excel though!) and selecting green from the pallette.


I do the same for when Cell B3 is less than B2, with the font becoming red.


Almost there. I don't need 3 conditional formats, I just change the existing font colour in the cells themselves. Not Yellow, it's too hard to see. Orange is a better choice, and I also make the font bold to make the arrows stand out a bit more.


Done! See you next time.

Wednesday, 22 April 2015

STDEVIF

Excel does not have a STDEVIF function. It's got other functions like COUNTIF(S), SUMIF(S) and AVERAGEIF(S), but is somewhat lacking when it comes to calculating conditional standard deviation.

If you have a lot of data, that can be a problem. Using array formulas or a UDF can slow things down. So let's focus on what's important, why not just get the calculation results? Forget using functions or VBA, why not both? (This applies to hard and soft tacos also!)

Here's my data. Note that the values in Column A are sorted. This is important.

 photo STDEVIF 1_zpscd11x9x8.jpg

In my little code snippet down below,

I want to add headers so I know which column to refer to, so bAddHeaders = True.

The headers are in Row 1, so lHeaderRow = 1.

Conditions (Class numbers in this case) are in Column A, so iCondCol = 1.

The values start in Column B, so iValsStartCol = 2.

The number of columns to calculate are 3 (Columns B:D), so iNumbOfCols = 3.

I'll put the results in Column F, so iEnterValsStartCol = 6

And I'll choose StDev for sFunctionType. I've also added Max for MAXIF and Min for MINIF, but feel free to add your own.

Update: Since I wrote this post, Microsoft launched Excel 2016 which includes MAXIF(S) and MINIF(S) functions. But like I say, this method is still very useful for a lot of other functions that don't have conditional variations yet! So for STDEVP, STDEV.S, STDEV.P, etc, substitute where necessary.

Here we go...

Sub GetConditionalData()
    Dim sFunctionType As String
    Dim lHeaderRow As Long
    Dim bAddHeaders As Boolean
    Dim lStartRow As Long
    Dim iCondCol As Integer
    Dim iValsStartCol As Integer
    Dim iNumbOfCols As Integer
    Dim iEnterValsStartCol As Integer
    Dim iCol As Integer
    Dim rCell As Range
    Dim rCond As Range
    Dim rAddVal As Range
    Dim rColumn As Range
    Dim sTemp As String
    Dim lCalc As Long
    
    On Error Resume Next
    
    'Change function type, columns, and headers as necessary
    '********************************************************
    
    'This code currently allows StDev, Max and Min
    'Add your own function types as required (See code below)
    sFunctionType = "StDev"
        
    'Add column headers
    bAddHeaders = True
    
    'Which row has the headers?
    lHeaderRow = 1
    
    'Which row does the data start?
    lStartRow = 2
    
    'Which column has the conditional data?
    iCondCol = 1
    
    'Which column do the values start?
    iValsStartCol = 2
    
    'How many columns to loop through?
    iNumbOfCols = 3
    
    'Which column to enter the calculated values?
    iEnterValsStartCol = 6
    
    '********************************************************
    
    Select Case sFunctionType
        
        'Add function types here
        Case "StDev", "Max", "Min"
        
        Case Else
        
        MsgBox "You did not choose an included function.", vbExclamation, "Get Conditional Data"
        
        Exit Sub
        
    End Select
    
    With Application
        lCalc = .Calculation
        .Calculation = xlCalculationManual
        .ScreenUpdating = False
        .EnableEvents = False
    End With
    
    With ActiveSheet
        
        For Each rCell In Range(.Cells(lStartRow, iCondCol), .Cells(.Rows.Count, iCondCol).End(xlUp)).Cells
            
            With rCell
                
                If rCond Is Nothing Then Set rCond = rCell
                
                If .Value = .Offset(1).Value Then
                    
                    Set rCond = Union(rCond, rCell.Offset(1))
                    
                Else
                    
                    Set rCond = Nothing
                    
                End If
                
            End With
            
            If Not rCond Is Nothing Then
                
                For Each rAddVal In rCond.Cells
                    
                    For iCol = 1 To iNumbOfCols
                        
                        With Cells(rAddVal.Row, iEnterValsStartCol + iCol - 1)
                            
                            'You must add code for your function type here
                            Select Case sFunctionType
                                
                                Case "StDev"
                                .Value = WorksheetFunction.StDev(Range(rCond.Offset(, iValsStartCol - iCondCol + iCol - 1).AddressLocal))
                                
                                Case "Max"
                                .Value = WorksheetFunction.Max(Range(rCond.Offset(, iValsStartCol - iCondCol + iCol - 1).AddressLocal))
                                
                                Case "Min"
                                .Value = WorksheetFunction.Min(Range(rCond.Offset(, iValsStartCol - iCondCol + iCol - 1).AddressLocal))
                                                                
                            End Select
                            
                        End With
                        
                    Next iCol
                    
                Next rAddVal
                
            Else
                
                For iCol = 1 To iNumbOfCols
                    
                    With Cells(rCell.Row, iEnterValsStartCol + iCol - 1)
                        
                        'You must add code for your function type here
                        Select Case sFunctionType
                            
                            Case "StDev"
                            .Value = WorksheetFunction.StDev(Range(rCell.Offset(, iValsStartCol - iCondCol + iCol - 1).AddressLocal))
                            
                            Case "Max"
                            .Value = WorksheetFunction.Max(Range(rCell.Offset(, iValsStartCol - iCondCol + iCol - 1).AddressLocal))
                            
                            Case "Min"
                            .Value = WorksheetFunction.Min(Range(rCell.Offset(, iValsStartCol - iCondCol + iCol - 1).AddressLocal))
                            
                        End Select
                        
                    End With
                    
                Next iCol
                
            End If
            
        Next rCell
        
        'Get the Column headers if required
        If bAddHeaders = True Then
            
            For iCol = 1 To iNumbOfCols
                
                Cells(lHeaderRow, iEnterValsStartCol + iCol - 1).Value = Cells(lHeaderRow, iValsStartCol - iCondCol + iCol).Value
                
            Next iCol
            
        End If
        
        With Range(.Cells(lStartRow, iEnterValsStartCol), .Cells(.Rows.Count, iEnterValsStartCol).End(xlUp)).Resize(, iNumbOfCols)
            
            'Enter zeroes in blank cells (eg, calculating StDev was not possible)
            .SpecialCells(xlCellTypeBlanks).Value = 0
            
            'Delete duplicates (comment out this code if you want to keep them)
            '******************************************************************
            For Each rColumn In .Columns
                
                For Each rCell In rColumn.Cells
                    
                    With rCell
                        
                        sTemp = Cells(.Row, iCondCol).Value
                        
                        If Cells(.Row, iCondCol).Offset(1).Value = sTemp Then .Offset(1).Value = ""
                        
                    End With
                    
                Next rCell
                
            Next rColumn
            '******************************************************************
            
        End With
        
    End With
    
    With Application
        .Calculation = lCalc
        .ScreenUpdating = True
        .EnableEvents = True
    End With
    
    On Error GoTo 0
End Sub

And we're done.

 photo STDEVIF 2_zpsc3rrhsoe.jpg

The code used the VBA version of STDEV (WorksheetFunction.StDev) to calculate the results, and put them in the appropriate column. So yeah, functions and VBA, Excel has fun for everyone.

Note the code deletes duplicates. I figure just one result per condition from each of the value columns is enough.

If you're using the data to print reports, like results per class, just use a LOOKUP function variant or MATCH/INDEX combination to find the relevant values.

How about STDEVIFS? Sure, just use suitable functions to get a unique string in a helper column, and refer to it instead. Then make sure it's sorted and you're good to go.

See you next time.


Thursday, 30 October 2014

Text Troubles

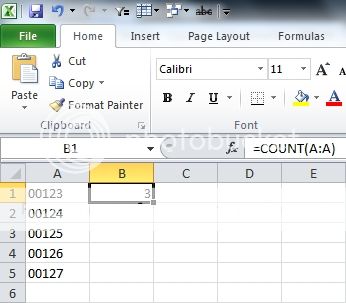
If you work with data from various sources, it's possible you will come across numbers formatted as Text. Depending on what you plan to do with these numbers, it's possible that the Text formatting will cause problems. For example, let's see how many "numbers" there are in the picture below. Look at the formula I've entered in cell B1.


Hmmm. Unlikely? No, I've been handed data apparently "managed" by 2 or more people, with different formatting within the same column. It does happen.

Let's set things right.

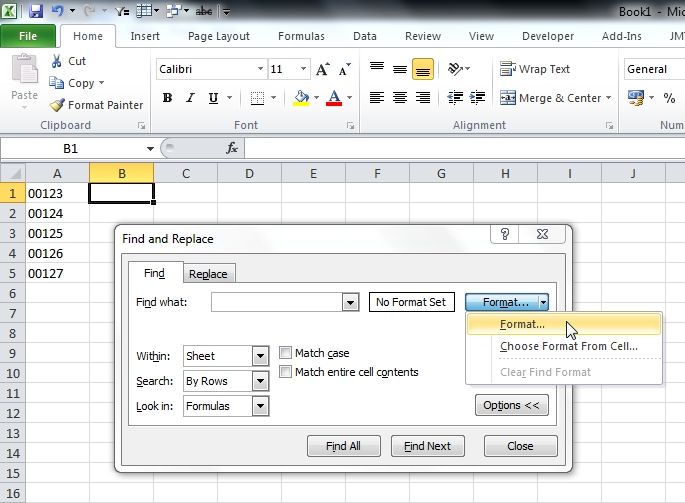
Clicking Ctrl + F on your keyboard brings up the Find and Replace dialog box. From there, click Format, then Format again.


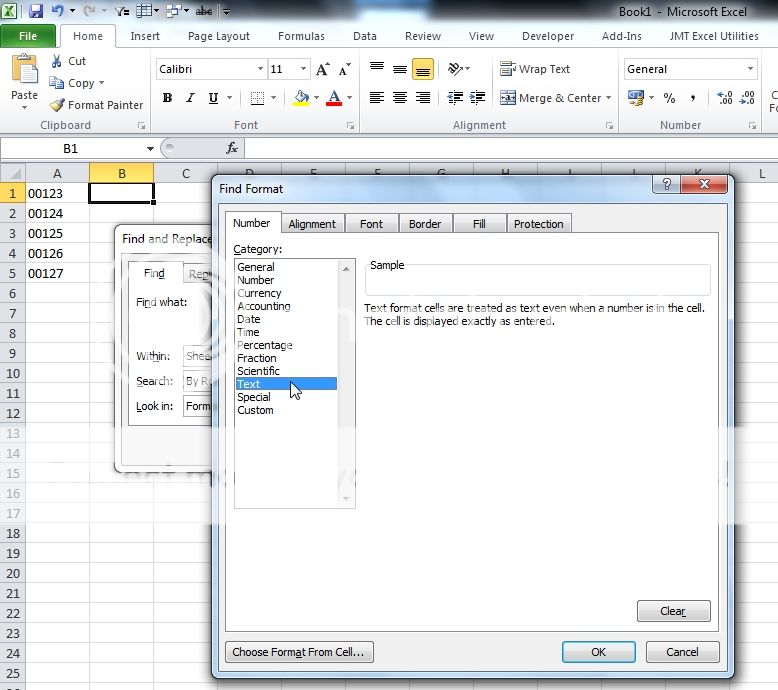
Select Text from the Number tab, then click OK.


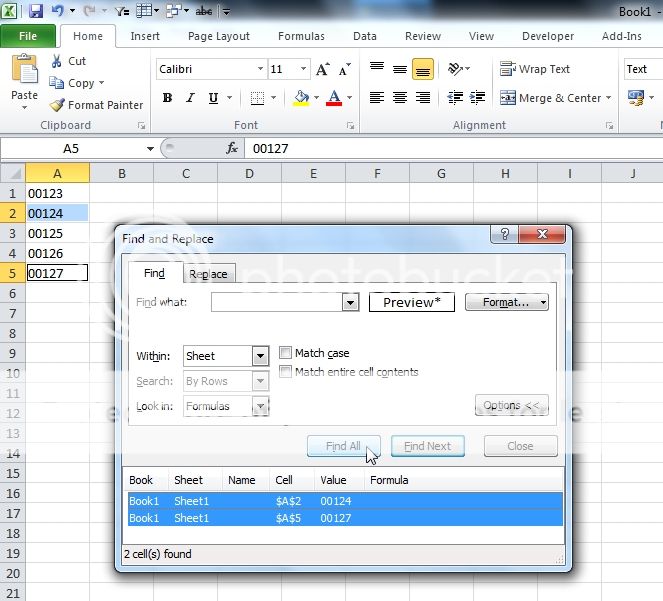
Click Find All, then type Ctrl + A on your keyboard to select all cells found with Text format.


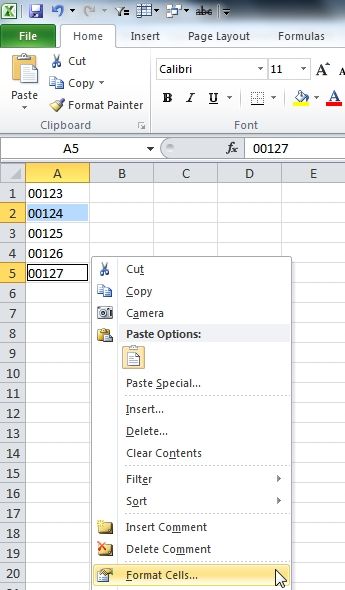
Bring up the right-click menu with your mouse (or keyboard) and select Format Cells.


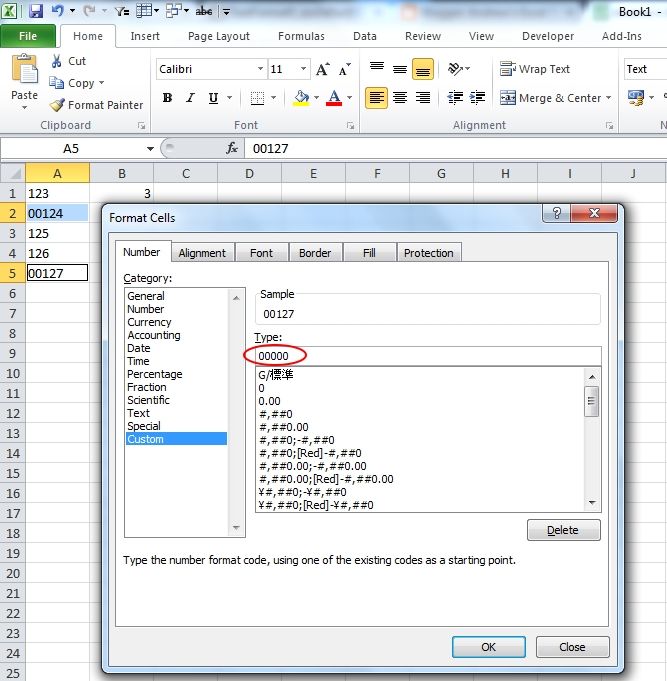
Now it's a matter of choosing a more suitable format. As it turns out, the other cells have been formatted as 00000 to show the numbers as 5 digits. To match this, I select Custom on the Number tab, then type in 00000 and click OK.


Yay! Hang on... cell B1 still shows a total of 3. Yikes!


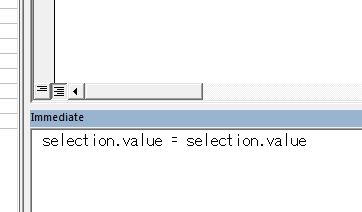
VBA is your friend. Make sure all cells are selected. Type Ctrl + F11 to show the Visual Basic Editor, then Ctrl + G to show the Immediate Window (if not already visible).

Now type

selection.value = selection.value


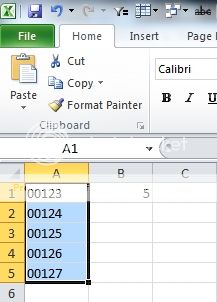
Click Enter on your keyboard. Now all looks good.


Treat yourself to a well-earned cup of tea or coffee. (The alcohol beverages come after work)

See you next time.

Wednesday, 22 October 2014

Alternate, Alternate Row Banding

Colouring alternate rows (or row banding) in Excel makes looking at data a lot easier on your eyes. There's so many ways to do it.

Back in the good old days, walking 20 kms to school in a blizzard, we used the below formulas with a suitable conditional format,

For odd rows use,

=ODD(ROW())=ROW()
or

=MOD(ROW(),2)<>0
For even rows use,

=EVEN(ROW())=ROW()
or

=MOD(ROW(),2)=0
Or even better, when using Autofilters,

=MOD(SUBTOTAL(3,A$1:A1),2)=0


(Last week's shopping was rather expensive)

But then along came Tables in 2007, with their automatic row banding making things easier. Gah!

Anyway, different colours for alternate rows is good but wouldn't it be even better if the colours change when values change? And still show different colours for alternate rows?

Here's one way to do it.

You'll need 2 helper columns. Let's say Columns A and B are available and values to decide the colouring starting in cell C1.

In cells A1 and B1, enter 1.

Then in cell A2, enter this,

=IF(C2<>C1,A1+1,A1)


and this in cell B2,

=IF(ISODD(A2),IF(B1=1,2,1),IF(B1=3,4,3))


and drag on down to the bottom of the list.


Now we enter some conditional formatting like this,


And we're finished. Here's a sample workbook.

See you next time.

Tuesday, 7 October 2014

AET Data Checker

At the moment, I am making lots of reports from raw data. Making sure my calculations are correct is downright tedious. Hmmm...


Here's my latest toy. I say "toy" loosely, not just because I'm a screw loose myself, but because I actually use it at work. Have done so since about 3 o'clock this afternoon and it it's still going strong.

Our company often deals with questionnaires for educational institutions, often with scoring being 1 - 5 or A - E etc, etc. Also sometimes students or staff leave questions unanswered, and this is part of the reports too.

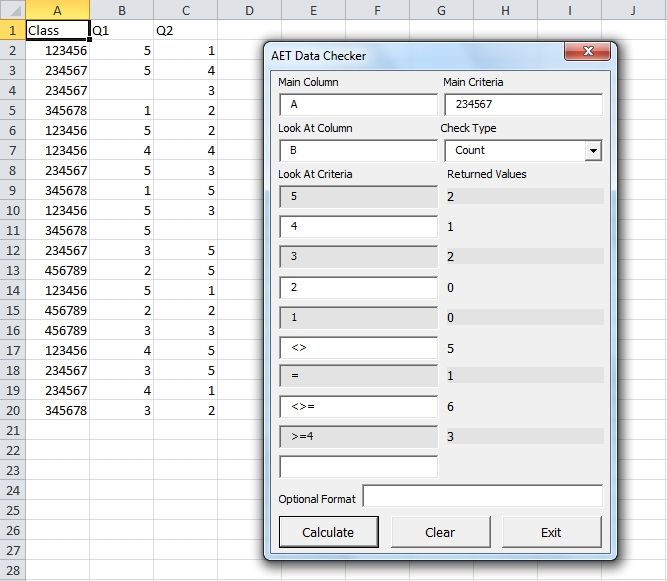
Count Example 1


As you can see I can check several values at once. By the way, <> looks at all cells with a value, = looks at all cells without a value (blank cells) and <>= looks at all cells, as long as they meet the criteria at the top.

And I can change the column I'm checking simply by editing the Look At Column field and clicking the Calculate button. Very, very fast.

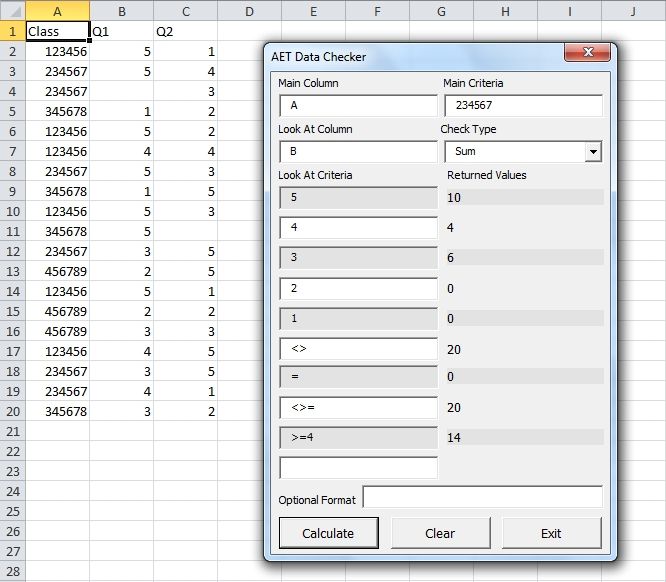
Sum Example 1


By changing the Check Type to Sum, I can get the totals. Note how it can do things like calculate all numbers >=4.

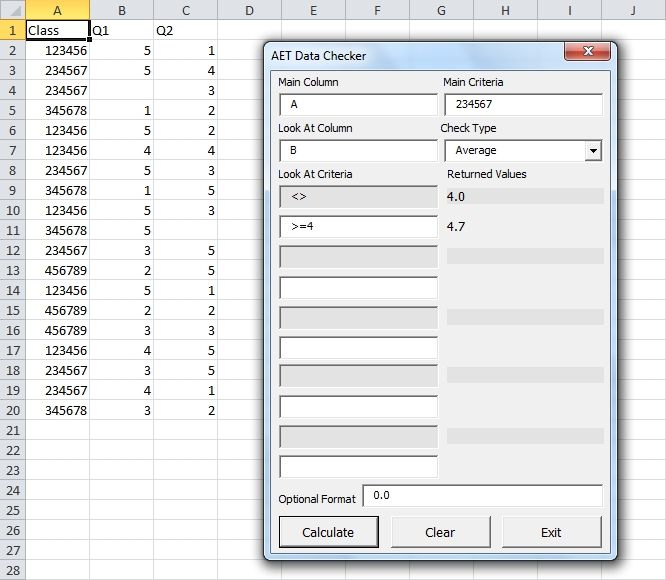
Average Example


Here I show the results using optional formatting of 0.0.

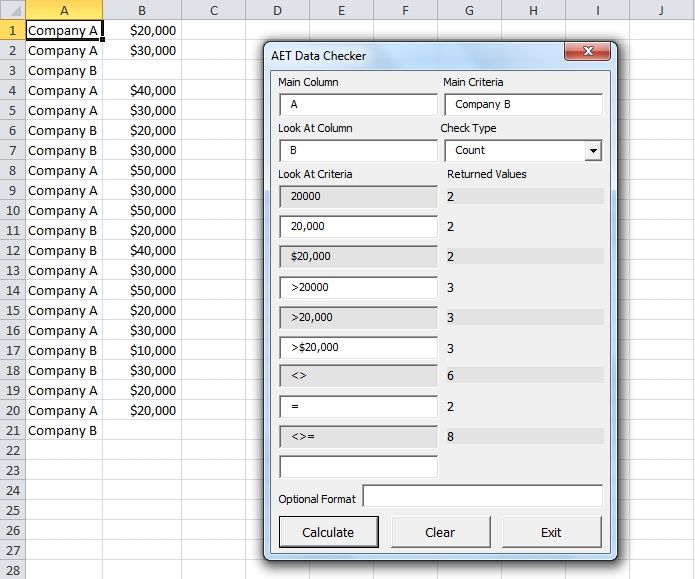
Count Example 2


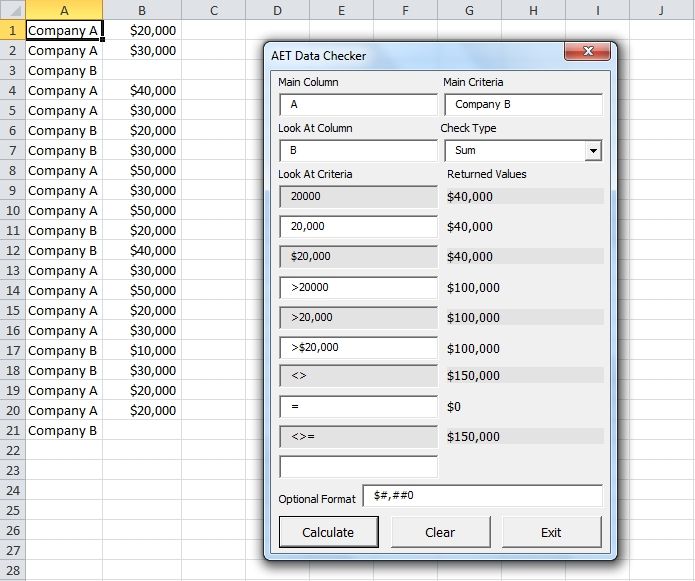
You could also use the form for other things like getting a tally of sales. Note how 20000, 20,000 and $20,000 are calculated with the same results.

Sum Example 2


If calculating totals, why not making things easier by adding a suitable format? ($#,##0)


:-)

You can download it here. (Excel 2007 or later only)

See you next time.

Sunday, 11 September 2011

Financial Date Formulas

Here are some financial date formulas that may come in handy.

To get the financial quarter use

=CHOOSE(INT((MONTH(A1)+2)/3),3,4,1,2)


To get the financial year use

=IF(MONTH(A1)<7,YEAR(A1)-1 &"-"& YEAR(A1),YEAR(A1) &"-"&YEAR(A1)+1)


Let me know if you have any alternatives.